Importing a DWG (Drawing) file into SketchUp can be incredibly useful, especially when you need to work with existing architectural plans or CAD drawings. SketchUp provides seamless integration with DWG files, allowing you to import them directly into your SketchUp workspace for further editing and modeling. If you’re looking to bring your DWG plans into SketchUp, here’s a step-by-step guide to help you through the process:
Step 1: Prepare Your DWG File
Before importing your DWG file into SketchUp, ensure that it is properly prepared and organized. This includes cleaning up any unnecessary layers, simplifying complex geometry, and scaling the drawing to the appropriate size if necessary. Ideally, your DWG file should contain only the elements you intend to work with in SketchUp.
Step 2: Open SketchUp
Launch SketchUp on your computer and create a new project or open an existing one, depending on your workflow. Once SketchUp is open, you’ll be ready to import your DWG file.
Step 3: Import the DWG File
To import your DWG file into SketchUp, navigate to the “File” menu at the top of the SketchUp interface. From the dropdown menu, select “Import” and then choose “DWG” from the list of supported file formats. Locate the DWG file on your computer and click “Open” to begin the import process.
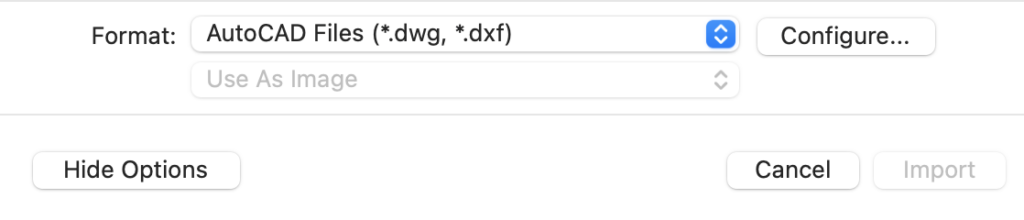
Step 4: Adjust Import Settings
After selecting your DWG file, SketchUp will prompt you with a dialog box containing import settings. Here, you can specify options such as the import scale, units, and layers to include in the SketchUp model. Review these settings carefully and adjust them as needed to ensure the imported DWG file aligns correctly with your SketchUp project.
Step 5: Complete the Import
Once you’ve configured the import settings to your liking, click “Import” to proceed. SketchUp will then import the DWG file into your workspace, converting it into SketchUp geometry. Depending on the complexity of the DWG file and your computer’s performance, this process may take a few moments to complete.
Step 6: Review and Edit
After the import is complete, take some time to review the imported geometry in your SketchUp model. You may need to make adjustments or edits to ensure that the imported DWG elements align correctly with your SketchUp project. Use SketchUp’s modeling tools and editing capabilities to make any necessary changes.
Step 7: Save Your Work
Once you’re satisfied with the imported DWG file and any modifications you’ve made in SketchUp, be sure to save your work to preserve your progress. Use the “File” menu to save your SketchUp project to a location on your computer or cloud storage service.
Importing a DWG plan into SketchUp is a straightforward process that allows you to leverage existing architectural drawings and CAD files in your SketchUp projects. By following the steps outlined above, you can seamlessly integrate DWG files into your SketchUp workflow and take advantage of SketchUp’s powerful modeling tools to bring your designs to life.