Designing a garden in LayOut using SketchUp allows you to create detailed, professional presentations of your landscaping projects. With the combination of 3D modeling in SketchUp and 2D documentation in LayOut, you can effectively visualize and communicate your garden design. Here’s a step-by-step guide to help you through the process.
Step 1: Create Your Garden Model in SketchUp
- Open SketchUp: Start by launching SketchUp and create a new file or open an existing one.
- Set Up the Site Plan: Import or draw the base of your garden area, including boundaries, pathways, and existing structures. You can use the Rectangle Tool or Line Tool to create the outline.
- Add Plants and Features:
- Use the Components panel to insert trees, shrubs, flowers, and other garden elements. You can find many plant models in the 3D Warehouse.
- Create garden features such as benches, fountains, or raised beds using the Rectangle Tool, Push/Pull Tool, and Move Tool.
- Apply Materials: Use the Materials panel to apply textures to your plants and hardscape elements, enhancing the realism of your model.
Step 2: Prepare Your Model for LayOut
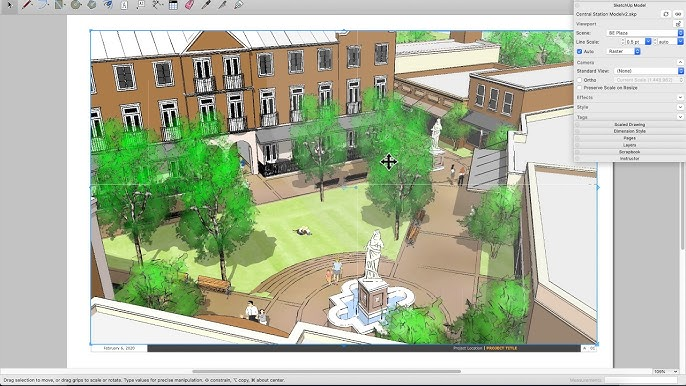
- Position the Camera: Select an appropriate view that showcases your garden design. You can use the Orbit Tool to adjust the view as needed.
- Create Scenes: Set up different scenes in SketchUp to capture various angles and details of your garden. Go to View > Animation > Add Scene to save your views.
Step 3: Export Your Model to LayOut
- Open LayOut: Start LayOut and create a new document.
- Import Your SketchUp Model: Click on File > Insert, then select your SketchUp file. Place it onto the LayOut page.
- Choose the View: Select the appropriate scene you created in SketchUp from the SketchUp Model panel. Adjust the scale to fit your layout.
Step 4: Add Dimensions and Labels
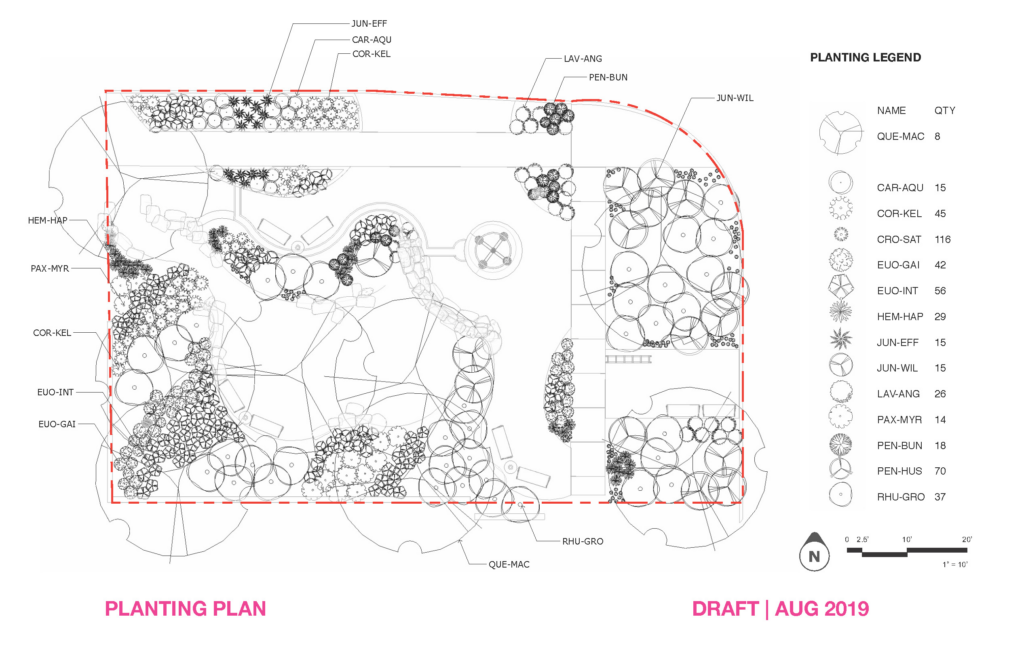
- Use the Dimension Tool: Add dimensions to indicate sizes and distances within your garden. Go to the Dimensions toolbar and click on the points you want to measure.
- Add Text Labels: Use the Text Tool to label different elements in your garden, such as plant names, materials, and features. This helps clarify your design for viewers.
Step 5: Incorporate Additional Elements
- Import Images: If you have any images of plants or materials, you can import them into LayOut for reference. Click on File > Insert and select the images.
- Create a Legend: Consider creating a legend or key for your garden plan, explaining the symbols used and giving more information about the plant species and features.
Step 6: Finalize Your Layout
- Adjust the Page Layout: Use the Page Setup option to configure the size and orientation of your LayOut document.
- Organize Elements: Ensure that all elements are clearly visible and not overlapping. Use layers if necessary to manage visibility.
- Check for Consistency: Make sure fonts, colors, and styles are consistent throughout your document for a professional look.
Step 7: Export and Share Your Garden Design
- Export Your Layout: Once you’re satisfied with your garden design, go to File > Export and choose your desired format (PDF, PNG, etc.).
- Print or Share: You can print your design or share it digitally with clients or collaborators.
Conclusion
Designing a garden in LayOut using SketchUp combines the powerful modeling capabilities of SketchUp with the detailed documentation features of LayOut. By following these steps, you can create visually appealing and informative garden designs that effectively communicate your vision. With practice, you’ll be able to enhance your presentations and bring your landscaping ideas to life!
Feel free to ask if you have any questions or need further assistance!