Transferring models from ArchiCAD to SketchUp can streamline workflows for teams using both platforms. To ensure the process is smooth and efficient, follow these best practices for file conversion, optimization, and editing:
1. Preparation in ArchiCAD
Before exporting your model, take these preparatory steps in ArchiCAD to ensure clean, optimized geometry in SketchUp:
Simplify the Model
- Remove unnecessary objects or elements that are not essential for visualization in SketchUp.
- Delete interior objects (e.g., furniture) if only the exterior is needed.
- Replace complex parametric objects (e.g., doors, windows) with simplified versions.
Clean Up the Layers
- Organize layers and turn off visibility for unnecessary layers.
- Name layers logically to maintain clarity during import.
Optimize Geometry
- Check for overlapping or duplicated geometry.
- Reduce polygon count by simplifying curved or detailed objects, as SketchUp struggles with overly complex models.
2. Exporting from ArchiCAD
Archicad offers multiple export formats compatible with SketchUp. Choose the most appropriate based on your requirements:
Export Options
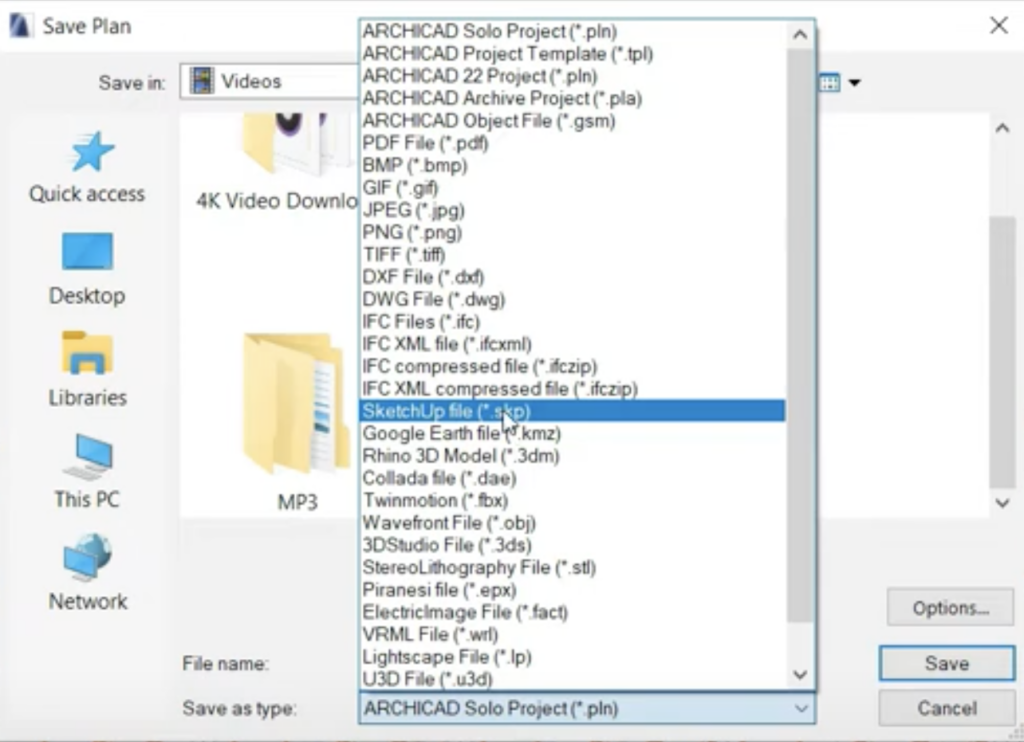
- SKP (SketchUp Format):
- ArchiCAD allows direct export to SKP. This is ideal for preserving materials and minimizing errors.
- Steps:
- Go to File > Save As > SketchUp Files (.skp).

- Set the export options, ensuring materials and textures are included.

- IFC (Industry Foundation Classes):
- Use IFC for precise geometry transfer with layer structure.
- Steps:
- Export via File > Save As > IFC. Use a detailed translator for building elements.
- Once in SketchUp, use an IFC importer (Pro version required).
- 3DS or OBJ:
- Export as 3DS or OBJ for better control over texture mapping.
- Use this format if you plan to edit textures or complex objects in SketchUp.
3. Importing into SketchUp
Once exported, properly import the model into SketchUp:
Prepare SketchUp for Import
- Use the File > Import function and select the exported format.
- Ensure the correct units (meters, millimeters, etc.) match the original ArchiCAD project to avoid scaling issues.
Check and Adjust
- Materials: Some textures may need reassignment or adjustment in SketchUp.
- Layer Management: Check if ArchiCAD layers are correctly imported.
- Fix Geometry: Use SketchUp tools to clean up any misaligned or overlapping geometry.
4. Post-Import Optimization
After import, refine the model in SketchUp for better performance and usability:
Optimize File Size
- Use SketchUp’s Purge Unused feature to remove unused components and materials.
- Simplify geometry further if performance is lagging.
Group and Component Organization
- Organize imported elements into groups or components to maintain structure and improve editability.
- Align naming conventions with your SketchUp workflow.
Reassign Materials
- Improve visual fidelity by reassigning materials in SketchUp’s material editor.
- Add detail by using high-quality textures if needed.
5. Collaboration Tips
When working with teams or sharing models between ArchiCAD and SketchUp users:
- Standardize Formats: Agree on a common file format (SKP, IFC) to minimize compatibility issues.
- Version Management: Use SketchUp Pro for better compatibility with IFC files.
- Testing: Always test small sections of your model before transferring the full project.
6. Troubleshooting Common Issues
- Scaling Errors: Double-check units during export and import.
- Missing Textures: Re-export ensuring textures are included, or manually re-link in SketchUp.
- Slow Performance: Simplify the model or upgrade SketchUp’s graphic settings for better handling.
Conclusion
By simplifying models, selecting the right export format, and optimizing the imported file, you can ensure seamless integration of ArchiCAD projects into SketchUp. Proper planning and preparation are key to preserving model fidelity and performance during the transfer.


